A 9-Step Guide to Developing a Mobile App
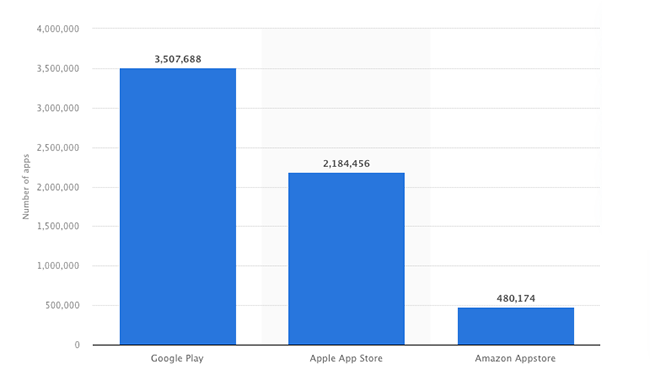
When the App Store launched in July 2008, it offered only around 500 apps. Within three days of launch, the App Store recorded more than 10 million downloads, highlighting how popular mobile apps have been since they first appeared. By the middle of 2022, there were more than 2 million apps in the App Store, with Google Play boasting more than 3 million apps. While many of these are gaming apps, there are many popular—and successful—apps in every app store category. There is still plenty of opportunity for you to develop a mobile app.
Developing a mobile app to take on the likes of Uber, TikTok, Tinder or even Amazon might be what you want to do. Or maybe developing a mobile app to support your business is your purpose. Regardless of your reason for creating an app, it all starts with knowing the steps involved. Developing a mobile app isn’t just about the actual development, design, and coding. There are several crucial steps that come before that. And there are a few equally important steps that follow the development and launch. We’ve put together this guide to not only list these steps but also take a meaningful look at what each step involves.
Develop Your App Idea
Developing a mobile app without first developing your idea for the app is not possible. Many app ideas start out as a problem and are intended to fix the problem or make it less of an issue. But developing a mobile app based on that initial spark is not how you end up with a successful app. You need to answer a few questions that will help confirm your idea for an app is viable. In the process, you will also add substance to your idea.
Audience and Purpose of the App
Begin by asking yourself what the purpose of the app is. Not only for you or your business but also for the potential users. Does it solve a problem, and if so, how big of a problem is it?
If you’re a retailer, you might want to build an e-commerce app. This would make it easier for your customers to browse and purchase your products. For example, this brand offers spironolactone for hair loss and promotes this product in their app, which can be downloaded by scanning a QR code in the website footer. The benefit to your business is that you are likely to see a positive bump in sales. But you also gain a new marketing channel through which to reach customers. And hair salons and restaurants can benefit by making appointments or reservations easier to book.
Your app must not only benefit you by solving a problem you have. It also needs to address a problem experienced by your potential audience. And that audience needs to be big enough to justify you developing a mobile app.
Competitors and App USP
A perfect scenario would see your app being unique with no competitors—nobody trying to solve the problem you plan to address. That is unlikely to happen. But just because there are already one or more similar apps doesn’t mean you should abandon your idea.
Decide who your competitors will be. Thoroughly investigate their apps and how they work. Then work on your idea so your app solves the same problem better. What features are they lacking that users are asking for? Can you make your app easier to use than theirs?
How your app differs—and is superior—becomes your app’s unique selling proposition (USP).
Finally, you need to consider the resources needed for developing a mobile app. Not only financially, but also in terms of time and effort. Are they enough to see the development of your app through to launch and beyond? Because developing a mobile app doesn’t stop once the relevant app stores accept and publish your app.
Researching the Market
While expanding on your app idea in the previous step, you would have already done some basic research on your audience and competitors. But now you need to expand on this research to give you a better idea of who your target users are. Understand what users want from an app such as yours and gain better insights into your competitors and what they are doing. Doing this not only validates your app idea, but it also helps you better assess the viability of your app.
You do this by carrying out surveys and conducting interviews to better understand the audience you are targeting. Focus on understanding their needs in relation to the problem(s) you want your app to address. Your app shouldn’t do what you want it to do. Rather, it should do what your target audience wants or needs it to do.
If there are a few apps that yours would be competing against, you need to understand what users don’t like about them. Get answers from your surveys and interviews. Look at the design of competitor apps, functionality and ease of use, and features users like or feel you should add.
If there are apps on the market that already do what you plan to do with yours, you need to differentiate your app. Make it better, easier to use, or offer features missing from the other apps. Users must have a reason to choose your app over all the others. Careful research will also help you understand what would make users download your app.
This step can be a little challenging because you can’t always use your family and friends for the research. They won’t always align with your target audience. If you have a business and want to develop a mobile app to support the business, ask your customers to participate in your research. And if your budget allows, you could use a market research specialist to take care of the research for you. You can even get insights from experienced strategic planning consultants and leverage their expertise to refine your strategy.
Set Out the Core App Features
Finding the right balance of app features and functionality can be tricky. Adding too many features complicates your app for users. It will also have a significant impact on the development costs and timeframe. But adding too few will also frustrate users.
There are a large number of features you could consider, but popular user features include:
- Booking System
- Push Notifications
- Loyalty & Membership Cards
- Coupons & Promotions
- Payment Processing
- Various Sign-in or Authentication Methods
- GPS and/or Geolocation Features
- Profile & User Management
- Call or Messaging System
- Support & Feedback
- QR Code Functionality
Focus on core features—features that support the primary purpose of your app and differentiate it from competitors. You can list non-essential features that you believe will improve usability on your app development roadmap. And you can include them in your app in future releases.
Don’t forget about behind-the-scenes features that users don’t see but are essential.
App analytics are key to knowing how popular your app is. They also show how frequently people use your app (and for how long) and which features are most popular. You could consider using mobile analytics tools to find out this information as an insight for improvement.
Establishing the Flow With Mockups or Wireframes
Mockups and wireframes are like floor plans for a house or building. A floor plan uses flat shapes to show where walls, doors, and windows go. It also uses shapes to represent furniture and bathroom fixtures. But it doesn’t show you what the windows and doors look like. Nor does it show the finish of the walls or even the style of the bath. But it does help you visualize the flow. Giving you an opportunity to change the layout before any building work starts.
Similarly, your computer mockups or wireframes will use shapes and elements to roughly set out the layout of each screen. It allows you to visualize the flow of the app and how easily users can navigate to different screens. Your wireframe also makes it easy for you to move various features and navigation elements about to improve usability. And to work out what happens when a user taps on different elements.
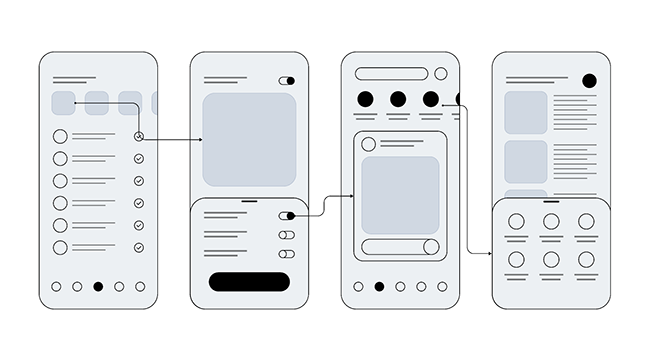
There are a number of programs you can use for creating your mockup or wireframe. But you could just as easily draw your mockup on paper or a whiteboard. You are using it to get the layout and flow established, not to show the actual design of the app. Once you have finalized the layout, you can create a design prototype. This would more accurately show the design elements and colors of the app.
When assembling your wireframe and prototype, remember to account for different screen sizes and resolutions. You wouldn’t want your app to be less user-friendly on smaller screens. App Development
With research and feature, flow, and layout finalization taken care of, you’re finally getting ready to start developing a mobile app. But again, there are decisions you first need to make. There are three primary app development methods you can follow, each with its own strengths and weaknesses.
Native App Development
A native app is one that is developed for a specific operating system (OS), such as iOS or Android. You can only use a native app on devices running the OS the developer built it for. To use it on another OS, you would need to redevelop the entire app for the other OS. You would be able to reuse most of the design elements. And many—if not all—features could be included in all app versions. But the underlying code, and possibly even the programming language, would have to change.
Common languages used for native apps include Java, Swift, Objective-C, Kotlin, and C++.
The benefits of native apps include that they are faster and more stable than other apps. There is also tighter integration between them and the OS they were developed for. This allows your app to access device features such as Bluetooth, cameras and camera roll, contacts, maps, and more.
A significant disadvantage of native apps is that they are the costliest to develop. Whatever it costs to develop the app for one OS is what you can expect to pay when developing it for another OS. Native apps also have the longest development cycle. And there is a risk that you will have to rewrite portions of the app following significant OS updates.
Web-based App Development
A web-based app is essentially a responsive website that a developer adapts to work on most mobile devices. Instead of downloading and installing the app from the App Store or Google Play, you access it via your device’s browser. Progressive Web Apps are a popular type of web-based mobile app that also allows for some offline functionality.
Common languages used for web-based apps include HTML5, CSS, JS, PHP, and Ruby.
Web-based apps can be developed faster than other app types while also being one of the most affordable to create. However, there are also noticeable disadvantages to web-based apps. Commonly used browsers such as Chrome, Safari, Firefox, and Edge. There are differences in the way they have each implemented many web standards. This can result in your app looking or behaving differently in certain browsers. Along with the risk that some features won’t be available at all.
Finally, because users cannot install web-based apps on their devices, they are mostly useless when working offline. You can develop it in such a way that users can still launch the web app when offline. But this does mean some features won’t be available until the user goes online again. Updating information, completing a transaction, and other features require an internet connection to work.
Hybrid App Development
Hybrid apps are—at their core—web-based apps wrapped in a native app shell. This makes them easier, faster, and less expensive to develop. And you can still add your app to app stores and users can install it on their devices. Unlike true web-based apps, hybrid apps don’t open in the user’s browser. They look and behave more like a native app. They can use APIs and access some OS and device features.
Common languages and frameworks used for hybrid apps include Ionic, HTML5, CSS, JS, PhoneGap, React Native, and Flutter.
Because the core of the app is a web-based app, it will work on both iOS and Android devices. There is no need for a separate version for each OS. This is what contributes to faster and more affordable development.
Hybrid mobile apps use WebView to display the content of the app, but iOS and Android both implement WebView differently. There might be some features that don’t work or behave differently depending on the OS. Another disadvantage of hybrid apps is that they are somewhat slower than native apps, which affects the user experience.
You also need to decide how you are going to develop the app. Options include:
- Doing it yourself means you need to have knowledge of the programming languages and platforms you are developing for. It could take much longer to develop your app, depending on how much time you can dedicate to its development.
- Hiring a freelancer—you won’t have much difficulty finding a freelance developer able to build your app for you, including options like software developers in the Philippines. But you will need to take extra care when assessing their skills by looking at examples of their work. More costly than doing it yourself. But it leaves you free to focus on your business and the marketing plan for the app.”
- Hiring an app development agency—probably the costliest option, but it is best if you are looking for a powerful app with complex features. And can afford it. They will set out clear development milestones, making it easy for you to monitor progress. They might even be able to take care of app testing for you.
- Using your own software development team—larger businesses with their own in-house software team might be able to use their own employees to build their app. Naturally, this does depend on them having the necessary skills and time.
- Using a white-label app—White-label apps are sort of like templates that you can customize to match the look and feel of your brand without actually having to develop an app from scratch. For instance, there are many white-label OTT apps for businesses looking to start their own OTT streaming services.
- Using an app builder platform—platforms such as nandbox make it easy for non-technical people to rapidly develop their own mobile app. You still need to do market research, work out what features your app should have, and determine structure and flow. But the app builder takes care of the actual coding. The most important thing to do when using an app builder is to choose carefully. nandbox is the only no-code app builder that helps you develop a native app. Other app builders only support hybrid or web-based apps. So, you either end up with an app that lacks performance or one that users can’t install via any app store.
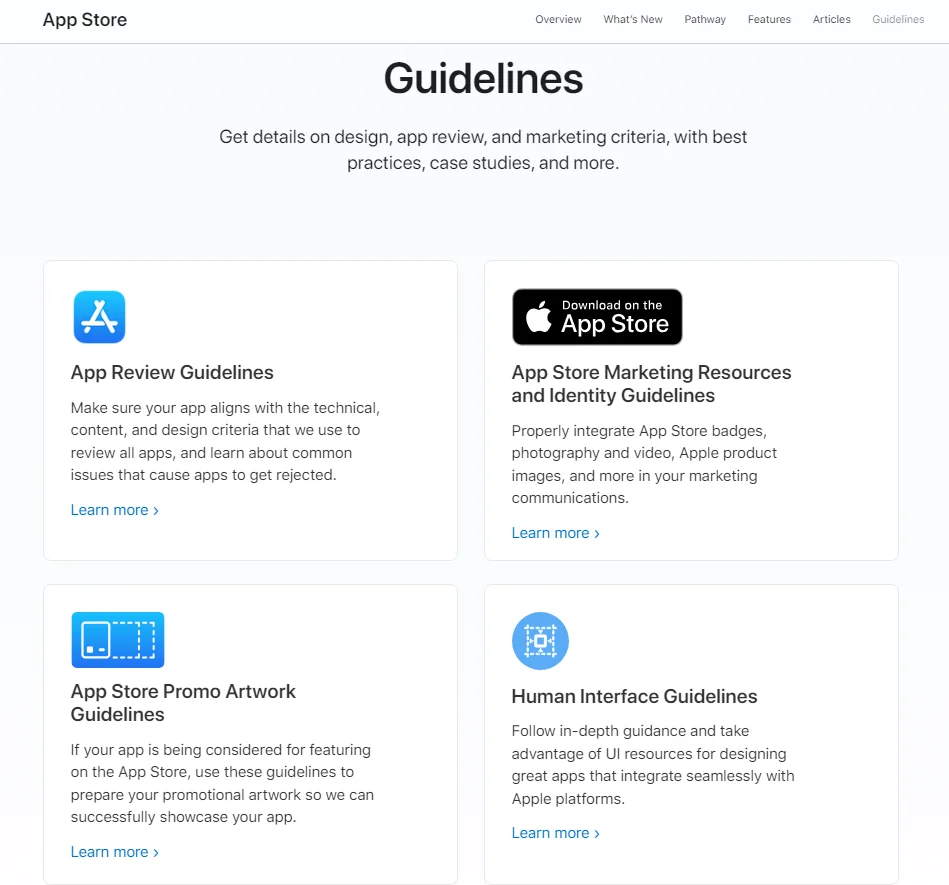
You must be aware of Google Play developer policies and Apple’s App Store review guidelines before submitting your app. But they can also be of benefit during the development stage. Both Google and Apple have published policies and other resources that can influence the look and behavior of your app. Being familiar with these can help mitigate the risk of the app stores rejecting your app. Some reasons for rejection are minor and will only require one or two simple changes before you can resubmit it. But some could require you to make significant changes to the app. This not only delays the launch of your app but could also mean spending more on development to fix issues.
Regardless of how you go about developing a mobile app, you will need to make provision for users to test your app before you publish it. This will help you see how the app performs and functions on different devices. Testing also allows you to identify bugs and assess usability. The layout and flow of the app likely make sense to you. But does it make sense to users? Do they struggle to find the features or information they need? And without testing, you won’t know this until users start telling you, or worse, simply abandoning your app.
Publishing Your Mobile App
Once development and testing are complete, you will need to submit it to the relevant app stores for evaluation. Only do this once you are sure you are ready to launch your app. This involves creating an Android developer account and/or enrolling in the Apple Developer Program. You should also check again that your app complies with Apple’s App Store review guidelines and Google’s app developer policies.
After submitting your app to the relevant app store(s), it could take a few days before anyone reviews it. If it meets all the requirements, it will then appear under the relevant category in the app store. Users can then install and use your app, and you can ramp up the marketing of your app.
Marketing Your App
Marketing your app can start well before you’ve even finished developing it. But it must continue after it has launched, too. There is a large volume of apps on both the Apple Store and Google Play. You shouldn’t expect people to just stumble across your app.
Pre-launch marketing can be as simple as creating a landing page for your app. Include some information on the app and confirmed features. And add a field that allows visitors to submit their email addresses to be notified when the app launches. This is a simple, low-cost method to create awareness and even land your first few users. There are many free landing page builders available online that can help you easily create a pre-launch landing page for your app, even if you have little to no web design experience.
Replace the landing page with a website that includes more detail and direct links to install the app. You can then promote the app with paid search campaigns on Google Play, the App Store, and Google Ads. And also promote it on relevant social media platforms.
When doing your market research, you should have learned more about where your audience spends their time online. Hire a landing page creation agency and tell them the metrics. But you should also have discovered what their interests are and what their needs are that align with your app. These can all help you target your marketing more effectively. If your app is meant to support your business, you can promote it to your customers too. But remember, your marketing shouldn’t only appeal to current customers; it should also attract new customers.
Another component of marketing your app is app store optimization (ASO). Similar to SEO for websites, ASO involves optimizing your app store listing to make your app more appealing. It can also be used to improve its discoverability through the use of keywords, descriptions, and images of app screens.
Track and Measure App Metrics
If you don’t track and measure the key metrics of your app, you have no idea if it is successful. You also won’t be able to detect performance issues. Or be able to assess features or areas of the app that users dislike or find problematic. Key metrics to watch include:
- Retention rate
- Daily and monthly active users
- Session length
- Cost per acquisition
- App load time
- Behavior flow
There are many tools you can use to track and measure key app metrics. However, Google Analytics for Firebase and Flurry are both no-cost options with a powerful suite of features. We’ll take a deeper dive into app metrics in a future post.
Maintain & Improve Your Mobile App
There is rarely a point at which an app developer can say their app needs no more development. Technology is ever-evolving and improving, presenting you with opportunities to also improve your app. This could be through the introduction of new features, changes to the layout, or even incremental performance improvements. Many potential users will also look at when the developer releases an update for an app before installing it. If it has been too long, they will assume that nobody is maintaining it and will not install the app.
Many opportunities for maintenance and improvement will come about through careful monitoring of your app metrics. Not forgetting feedback from users and following minor and major updates to device operating systems. Both Google and Apple typically release a significant version change to Android and iOS once a year. But there are dozens of smaller updates released throughout the year. It is important to remain current with release announcements, as these can introduce changes that require changes to your app.
Developers have early access to OS updates. So, you can test your app and implement changes before the OS update rolls out to all users.
Developing a mobile app is complex but not necessarily complicated. Breaking the process down into steps allows you to focus on completing one component of the process. And only then can we move on to the next. And with nandbox, you don’t even need a high level of technical skill. But we would recommend not skipping any of the steps outlined above. on top of that, nanbdox offers a simple drag-and-drop interface as well as an extensive library of industry-specific app templates. That way you can create full-featured native iOS and Android apps in just minutes without writing a single line of code. Sign up now and build native iOS and Android apps without coding!
How to Create an App Using ChatGPT without Coding On a Budget
Ever wondered how to create an app using ChatGPT? With nandbox App Builder GPT, you can build both iOS and Android native apps using ChatGPT without coding. Just describe what you want in ChatGPT, and once you finish the conversation, the GPT instantly gives you a direct link to nandbox, where your app is already generated and ready to be customized or published. nandbox allows you to create fully functional native apps on a budget. Our Premium Plan is the best pricing plan to create native iOS and Android apps with all the essential features and launch them on both the Apple App Store and Google Play Store with zero coding.