How to Master App Store Optimization
There are millions of mobile apps in both the Apple App Store and Google Play Store. And there are billions of smartphone users around the world. Still, you need to master app store optimization (ASO) to make your app more discoverable. Otherwise, your app becomes the proverbial “needle in a haystack,” nearly impossible to find without any effort. Nearly 50 percent of users find new apps by browsing the app store. This underscores the importance of ASO for the success of your app.

The nandbox no-code app builder allows you to create your own mobile app in minutes. But for users to discover and install your app, you need to put in more effort. Join us as we take you through all the essential steps of app store optimization. Taking you from novice to master.
What Is App Store Optimization?
Website operators use search engine optimization (SEO) to improve the visibility and discoverability of their websites. And app store optimization shares similarities with SEO. You want your mobile app to be more visible in the relevant app store. And you want users to discover it more easily when searching for specific apps. But while some aspects of ASO resemble SEO, the overall approach is quite different.
And if your app is available on both the App Store and Google Play, what and how you optimize will also differ. Usually, app store optimization agencies can lead you in this process, since they are aware of the ins and outs.
Apple App Store Versus Google Play Store
The type of information displayed for apps on the two major app stores is similar, but the ranking factors differ. And naturally, when engaging in ASO, you want to focus on the ranking factors. These include:
- App Name/Title
- App Short Description (only applies to Google Play Store)
- App Long Description (only applies to Google Play Store)
- App URL (only applies to Apple App Store)
- App Subtitle (only applies to Apple App Store)
- Keywords (only applies to Apple App Store)
- In-App Purchase Titles & Descriptions
- Ratings & Reviews
- Update Cycle
- Downloads & Engagement
- Hidden Factors
Two unique fields on both Google and Apple are also ranking factors. Additionally, Apple uses the app’s URL as a ranking factor. As with SEO, we do not know all the ranking factors.
Keyword Research for App Store Optimization
The first—and one of the most important—steps in ASO is keyword research. Finding the right combination of words and phrases that people might use is key. It is also an ongoing process. You aren’t going to find a winning combination of keywords on your first try. But in time, you will start to see which keywords result in more downloads and engagement.
There are several tools you can use for keyword research. If you use Google Keyword Planner, Semrush, or Ahrefs for SEO, you can also use them for ASO keyword research. Alternatively, you can look at ASO tools such as data.ai (formerly App Annie), Sensor Tower, AppTweak, Mobile Action, and TheTool. These tools will help not only with keyword research but also with other aspects of ASO.
You should focus on finding a balance between popular keywords, less competitive keywords, and what your competitors are using. But ensure that they are always relevant to your app. Keywords are less about what you want to be known for and more about what potential users will search for. They will be searching for problems and solutions. The importance of keyword research cannot be overstated when optimizing your app’s visibility and attracting potential users.
Apple’s App Store includes a field for keywords, but the field has a 100-character limit. So, you need to choose your keywords carefully. Useful strategies include:
- Eliminate spaces. You separate words in the keywords field with commas. But there is no need for a space before or after each comma.
- Don’t use phrases. If your app helps users manage tasks, “task management,” “weekly planner,” and “daily planner” might be suitable keywords. But you can achieve the same results with fewer characters by adding them as “task, management, planner, weekly, daily”. From 44 characters down to only 36.
- No plurals or stop words. There is no need to pluralize any words. The search algorithm will show your app even if the user searched for “tasks” or “planners”. You also should avoid using “app” as a keyword. It is a stop word and the search algorithm completely ignores it.
- No branding. The name of your app and your name (or company’s name) are keywords. But like the category, the search algorithm gets this information from your app listing instead of the keyword field.
- Sort by importance. Decide which are the most important keywords and put those at the front of the list. And try to use the full 100-character allowance. It won’t always be possible but push as far as you can. Using 96 characters is still a lot better than only using 73 characters.
The Google Play Store doesn’t have a keyword field. Instead, Google pulls keywords from your app’s description. So, when writing out your app description, you need to focus on including as many relevant keywords as possible. But without making the description difficult to read. Ensure that each keyword appears as natural as possible in the text. If necessary, you can repeat some keywords throughout the copy, but avoid keyword stuffing.
You can include keywords in your app’s title (and subtitle for the Apple App Store). The number of characters allowed is limited, so your app name comes first. You can include keywords as part of the app name, like NOAA Weather Radar Live or Waze Navigation & Live Traffic. Or you can separate it from the name using a comma, colon, or hyphen. Examples here include Postmates – Food Delivery and Spotify: Discover new music.
Finally, if you offer in-app purchases, the titles and descriptions for each are further opportunities to use relevant keywords.
App Title and Description
Apple talks about app name, while Google refers to it as the app title. They are the same thing, and both app stores limit it to only 30 characters. The actual name of your app should be short and memorable. Ideally, the name should also reveal what the app is for, but this isn’t essential. TikTok, Uber, Tinder, and many other apps have names that don’t give any clue as to their function. But Uber appears in the App Store as “Uber – Request a ride”. And Tinder uses “Tinder – Dating New People” in the app name field. They’ve both used important keywords to show what the app is for.
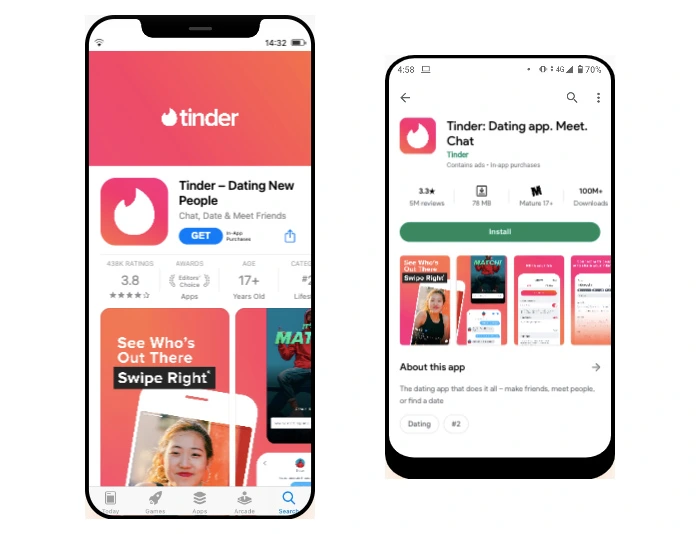
Naturally, Apple gives you another opportunity to quickly reveal your app’s purpose and use important keywords: the app subtitle field. As with the app name, the limit is 30 characters. Use this extra space wisely. Tinder has “Chat, Date & Meet Friends” as their subtitle, and Uber has “Find no-stress rides, anytime”.
You shouldn’t change the actual name of your app unless necessary. However, you can change the other (key)words used in the name and subtitle field regularly. You will do this while experimenting with different keywords to see which contributes to better visibility and installs.
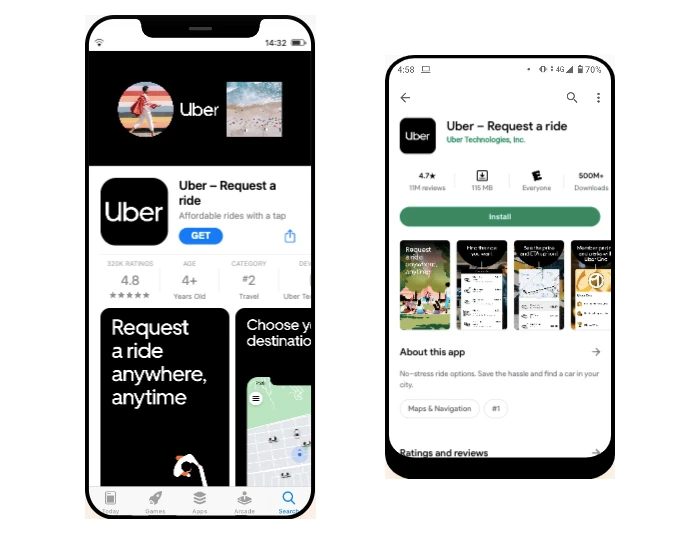
Google does not have an app subtitle field. But they do allow both a short and long description. And the short description is shown above the fold when someone visits your app product page. The limit is a generous 80 characters, giving you plenty of opportunity to include important keywords.
If done correctly, your app name and subtitle would grab the attention of potential users and pique their interest. But the app description could have a bigger role in converting. Keep it concise but informative, and structure it for easy reading and scanning. It should:
- Accurately describe what your app does. List some of the key benefits and features of your app in the app description. Every app should have a unique selling point (USP), and your app description should clearly convey what it is.
- Include relevant and important keywords naturally. But they should not resemble keyword stuffing. As noted under keyword research, including keywords in the app description is critical to discoverability in the Google Play Store.
- Include details of any subscription plans that are available through the app. Include the cost, the renewal period, and what features or benefits it provides. In some cases, it can be useful to also include information about in-app purchases offered.
- Include links to your privacy policy, terms and conditions, and FAQ page where applicable.
Study the app descriptions for both competitors and non-competitors. Look at how they structure their descriptions, and what information they include. Rewrite the entire description regularly, you can use an online article rewriting tool and this should include making changes to the keywords used. It is one of the best ways to assess the description and keywords that boost discoverability and installs.
Compelling App Visuals
Using the right keywords in your app store listing will improve your app’s visibility in search results and overall rank. But the number of times users install your app also influences how it ranks. Don’t restrict your ASO efforts just to getting your app name, subtitle, short and long description, and keywords perfect. You want your app to be highly visible on the app store. The listing must grab the attention of potential users and convince them to install the app.
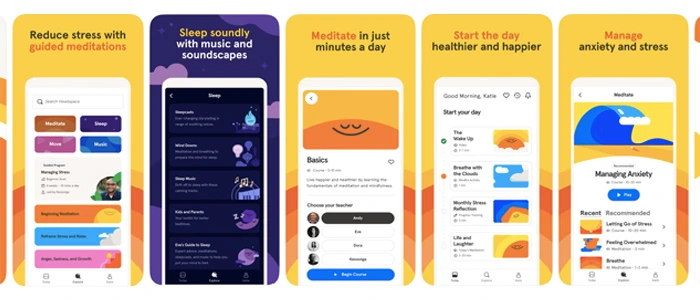
Your app description does play a prominent role in doing this. But so too do the visuals used in your app listing. You can add images and videos to your app product page on both Apple and Google. Before we share tips on making the most of images and videos, let’s look at the app store requirements.
Visuals Requirements for Apple App Store
- You must upload at least one screenshot or image, with a maximum of ten allowed.
- You can use images in portrait or landscape mode, and they must have .png or .jpeg file extensions.
- All images must be correctly sized for all the devices your app supports. Full screenshot specifications.
- You don’t have to add an app preview video, but they can boost installs. You can upload up to three videos.
- Videos must have .mov, .m4v, or .mp4 extensions. They must be 15 to 30 seconds long. Full video specifications.
- App preview videos autoplay on mute and can appear in search results and on the product page.
Visuals Requirements for Google Play Store
- You must upload at least four screenshots or images, with a maximum of eight allowed.
- You can use images in portrait or landscape mode, and they must have .png (24-bit with no alpha channel) or .jpeg file extensions. Supported aspect ratios are 16:9 or 9:16.
- The maximum file size for images is 8MB. And the maximum dimension of each screenshot cannot be more than twice as long as the minimum dimension. Full screenshot specifications.
- You don’t have to add an app preview video, but they can boost installs. You can only upload one video.
- You must first upload the video to YouTube, and then add the YouTube URL to the app listing. Full video specifications. To make the URL more manageable and aesthetically pleasing, you might consider using a tool to shorten a YouTube link.
- Video can be up to 30 seconds long and should be in landscape mode.
- The app preview video might autoplay on mute, depending on the user’s device. It can appear in search results and on the product page.
Maximize the impact of your screenshots and app preview video by:
- Making sure the images are high-quality, and clear, and showcase key features and benefits of the app.
- Arrange the images like a narrative, taking users from a brief overview before highlighting features and ending with benefits.
- Include some text with each image that sells the features and benefits.
- Don’t use lifestyle-type images. Avoid using a hand holding the phone, or images of people using the app as they don’t add any benefit.
- Your app preview video should have a narrative structure, starting with an overview before showing features and benefits.
- Because many people will leave the video muted, include text overlays that help them understand what they are seeing.
- Focus on key features and benefits. Trying to show all features in 30 seconds can result in a video that is difficult to watch.
- Test different screenshots and videos. As with keywords and the app description, you won’t get this right on the first go. Play around with different images, styles, layouts, and text to see what leads to more app installs.
- Outside of testing, you should refresh the images and video periodically. Especially whenever you add or remove features, or update the UI or layout of the app.
Use Screenshots.pro, Hotpot App Store Screenshot Generator, AppMockUp Studio, Figma, or App Launchpad to create your screenshot story. Previewed is a similar web app that can also help with app preview videos.
App Rating and Reviews
Positive ratings and reviews suggest that the app is popular. And popular apps appear higher in search results and are more visible in app stores. Users are also more likely to install apps that have positive reviews and ratings. And since downloads and engagement are also ranking factors, this further boosts the visibility of your app.
But getting users to rate and review your app does require a little effort on your part too.
- Prompt users to leave a review and rate their app. You can do this through in-app prompts, push notifications, and in other marketing material.
- Don’t prompt too soon. Choose the triggers for your in-app review prompts carefully. And make sure that they don’t appear soon after someone has just installed your app. You can also try to link the prompt triggers to a positive user action. This might include the user completing a level in a game or creating a profile and making a purchase.
- Don’t prompt too frequently. Apple specifically limits developers to only prompting users for a rating and/or review three times in a 365-day cycle. And even though Google doesn’t impose a similar restriction, frequent prompts can annoy users. Causing them to delete your app or leave a negative review.
- Respond to reviews. This applies to both positive and negative reviews. For positive reviews, thank the user and encourage them to share feedback and suggestions via email and social media. For negative reviews, respond to the negative points without being confrontational. Pay attention to points relating to the interface, overall experience, and bugs or flaws users identify. If you’re able to fix any flaws or bugs they mention, state this in your reply. This shows that you value their feedback and engage with users. But it can also result in users updating their rating and review more positively.
- Make sure links to support channels you offer are easily found in the app and on the app product page.
- Don’t pay for or incentivize app reviews. Both the major app stores prohibit offering incentives for ratings and reviews. But you should also stay away from using any service offering reviews for a fee. While you want mostly positive reviews, too many glowing reviews can also seem suspicious. And it also doesn’t reflect your user’s true experience.
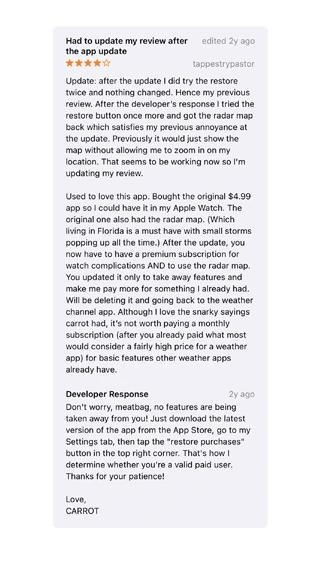
Finally, remember to analyze reviews. This will help you identify opportunities to continually improve the app. And it can help you identify bugs you might otherwise miss, while also revealing keyword opportunities.
Update Cycle and App Store Optimization
Users—and app store algorithms—favor apps that are updated regularly. This is because it signals that the app is still active and not abandoned. It also shows that the app is evolving and being improved. Whether through new features being added, or simple performance improvements and bug fixes.
Use the “What’s New” and “Release Notes” fields on both app stores to communicate what changes you have made. This is especially important for specific bug fixes, critical security notices, and new features.
App Store Analytics
You can’t improve what you don’t measure. And without monitoring key app metrics, you won’t know which of your ASO efforts aren’t delivering results.
Services such as data.ai, Sensor Tower, AppTweak, Mobile Action, App Radar, appfigures & APPlyzer aren’t just for ASO. They also offer a host of other app metrics and analysis tools. From how you rank in different markets, to views, installs, conversions, and even uninstall rates. And many of these metrics are a good indicator of which ASO efforts are working and which need more focus. While all app store optimization actions support each other, you don’t need to work on all of them every time. And you don’t need to update all of them regularly. Build up a history of app analytics. It will then be easier to detect issues that are having a negative impact on app visibility and installs. Whether caused by ASO and the app product page or your other marketing efforts.
And it is important to remember that ASO works in tandem with the rest of your marketing strategy. Whether paid advertising campaigns or awareness campaigns that you run on your social media accounts.
Mastering app store optimization is essential for the success of any mobile app. Use thorough and thoughtful keyword research, carefully crafted app title and description, and powerful screenshots and preview video. This will help increase the visibility, ranking, and overall success of your app in the app store. And engage with users through reviews and release regular updates using nandbox’s powerful no-code app builder. This will drive user discovery, engagement, and retention. Ensuring a greater chance of success for your app in the competitive app store market.
Finally, track and analyze your app’s performance to make data-driven decisions relating to your ASO and marketing strategies. And stay up to date with ASO best practices and trends, along with guidelines released by Google and Apple. With these tips, you can master ASO and drive the growth of your app to new heights.

