Are you ready to optimize your online sales tax process and set up your WooCommerce store?
Setting up a WooCommerce website on Best WordPress Hosting is enjoyable. It’s important to focus on writing perfect product descriptions, using excellent product images, and organizing the structure of your store.
In this guide, we’ll explore the available options for configuring taxes in WooCommerce, how to access these settings, and what each WooCommerce tax setting does.
Understanding Sales Tax and its Importance for Online Businesses
Online firms must consider sales tax since it has an impact on revenue and legal compliance. State and municipal governments apply this consumption tax on products and services that are sold inside their respective jurisdictions.
As an e-commerce store owner using WooCommerce hosting, understanding sales tax requirements is crucial to avoid penalties and audits.
Accurately configuring sales tax is essential to avoid penalties, back taxes, and legal troubles. Collecting the appropriate sales tax at the time of purchase ensures you meet your business obligations.
Accurately calculating and remitting sales tax also maintains transparency with customers and taxing authorities. Customers will trust you more if you are transparent about your prices and show that you follow the law and do business morally.
Researching Your Local Sales Tax Requirements
Researching local sales tax requirements is crucial when setting up your WooCommerce site. Each region has its own rules & rates, so it’s crucial to understand what applies to you. Start by checking with your state’s or country’s revenue department for up-to-date information on sales tax regulations.
Some areas have specific thresholds determining whether you need to collect sales tax, while others exempt certain products or services. Ensure these details are clarified in advance to prevent any compliance issues later on.
Stay informed about any new changes to the law that might impact your sales tax obligations. By taking the initiative and staying informed, you can manage the challenges of taxes while maintaining the efficiency of your online business.
How to Set Up Sales Tax in WooCommerce
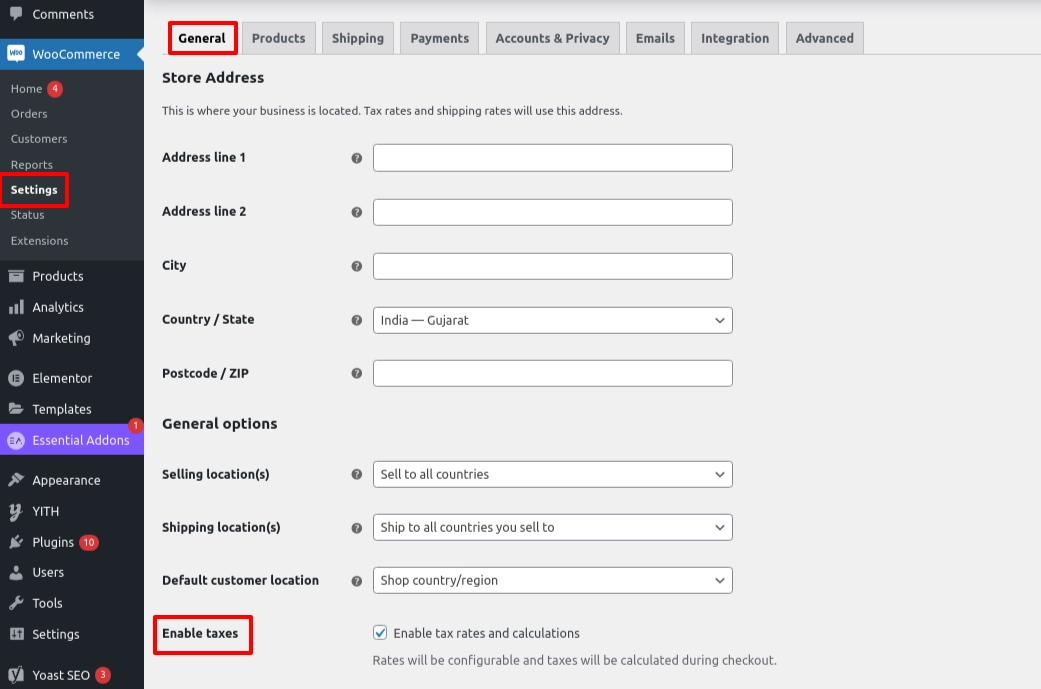
Step 1: Enable WooCommerce Taxes
To begin, you need to enable taxes for your WooCommerce store. Follow these steps:
- Log into your WordPress dashboard.
- Navigate to WooCommerce > Settings.
- Choose the General tab and find the option labelled Enable taxes.
- Check the box & click on Save Changes.
After completing these steps, a new Tax tab will appear in your WooCommerce settings.
Step 2: Configure Your Tax Options
With taxes enabled, you can now configure your tax options by going to WooCommerce > Settings > Tax.
Your choices for these options will depend on the tax jurisdiction where your store is located.
In the Tax Options menu, you’ll find several settings to understand before making your selections. Here is a detailed explanation of each option.
Prices Entered with Tax
This option determines whether the prices you enter for your products in WooCommerce include or exclude tax.
- Yes, I will enter prices inclusive of tax: If you set a product price at $120 and your tax rate is 10%, WooCommerce assumes that the $120 price already includes the 10% tax. Thus, the product’s base price is $109.09, and the tax portion is $10.91.
- No, I will enter prices exclusive of tax: If you set a product price at $120 and your tax rate is 10%, WooCommerce will add the 10% tax to the base price. Therefore, the product’s final price will be $132.
Calculate Tax Based On
This setting determines how WooCommerce calculates tax rates for orders based on customer and store addresses:
- Customer shipping address: Taxes are calculated based on the address where the customer wants the product shipped. For instance, if a customer in New York orders a product from a California-based store to be shipped to New York, WooCommerce applies the New York tax rate.
- Shop base address: Taxes are calculated based on your store’s location. For example, if your store is in Arizona, USA, WooCommerce applies the Arizona tax rate to all orders, regardless of customer or shipping address.
- Customer billing address: Taxes are calculated based on the billing address provided by the customer. For example, if a customer in Texas orders a product but provides a billing address in Old Tappan, WooCommerce applies the Texas tax rate.
Rounding
This setting decides how tax amounts are rounded during calculations. You have two options:
- Round at the line item level: This is the default option. It means each product’s tax is calculated and rounded individually before adding them up. For example, if a product’s calculated tax is $1.25, it might be rounded to $1.20 or $1.30, depending on rounding rules.
- Round at the subtotal level: If selected, the total tax for the order is calculated first and then rounded. For instance, if the total calculated tax is $12.50, it might be rounded to $12.00 or $13.00.
Choosing between these options depends on tax regulations or accounting practices that you follow.
Additional Tax Classes
The default Standard tax rate works for most products, but if you sell items that need different tax rates, you can add them here. Just list one tax class per line. You can add or remove classes as needed, but you can’t remove the Standard tax class.
After clicking Save Changes, the new tax classes you added will appear as sub-tabs at the top of the page. You can click on each subtab to add and manage the tax rates for that class.
Display Prices During Cart and Checkout
This setting controls how prices appear in your cart and during checkout. Choose between Including Tax or Excluding Tax to determine whether the prices shown include or exclude applicable taxes.
Price Display Suffix
The Price Display Suffix setting lets you add additional text after product prices, optionally showing the price including or excluding tax. You can use dynamic placeholders like {price_including_tax} and {price_excluding_tax} and customize text around them.
For example, entering “Price incl. tax: ${price_including_tax}” will display as “Price incl. tax: $50.00” in your store. This feature allows you to add tax-inclusive prices in small print on products where prices are initially configured without tax or vice versa.
When applied, the suffix appears in small print after the regular price on product pages. Due to performance considerations, price suffixes are not enabled by default for main variable products, but they can be used for individual variations after selecting variable options.
Step 3: Set Up Your Tax Rates
To set up standard tax rates, using a USA-based store as an example:
1. Go to WooCommerce > Settings > Tax.
2. Click on one of the tax rate tabs (Standard, Reduced Rate, Zero Rate) based on the type of tax rate you want to configure.
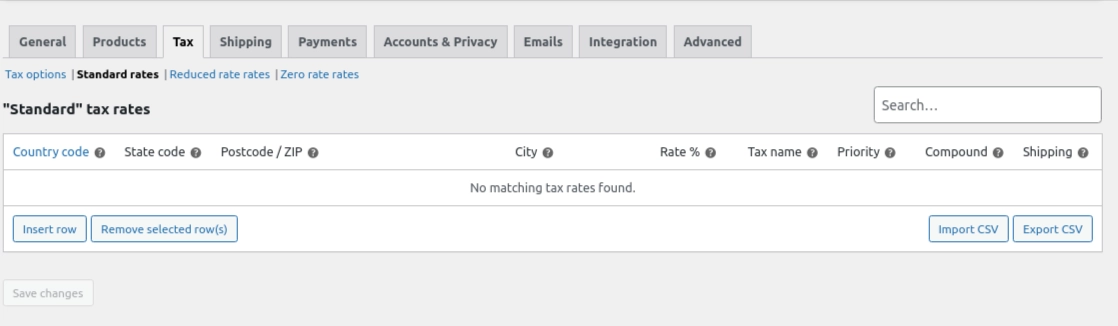
3. Click on the Insert row button to add a new rate.
- Country code: Add the two-letter country code (e.g., US for the United States).
- State code: Add the two-letter state code (e.g., NY for New York).
- Postcode/ZIP: Specify postal codes for the tax rate (leave blank to apply to all).
- City: Specify cities for the tax rate (leave blank to apply to all).
- Rate %: Enter the tax rate percentage (e.g., 5.25 for 5.25% or 30.000 for 30%).
- Tax name: Name the tax (e.g., VAT).
- Priority: Set the priority for the tax rate (1 is the highest priority).
- Compound: Check this box if this tax is compounded (calculated on top of other taxes).
- Shipping: Check this box if this tax applies to shipping costs.
After entering these details, click Save Changes.
Step 4: Apply Tax Rates to Your Products
After setting up your tax rates, the next step is to apply these rates to your products. This ensures that the correct tax amount is calculated at checkout based on the product type and customer location.
- Navigate to Products > All Products on your WordPress dashboard.
- Click on the product you wish to modify or select Add New to create a new product.
- In the Product Data section, go to the General tab.
- Locate the Tax status and Tax class fields.
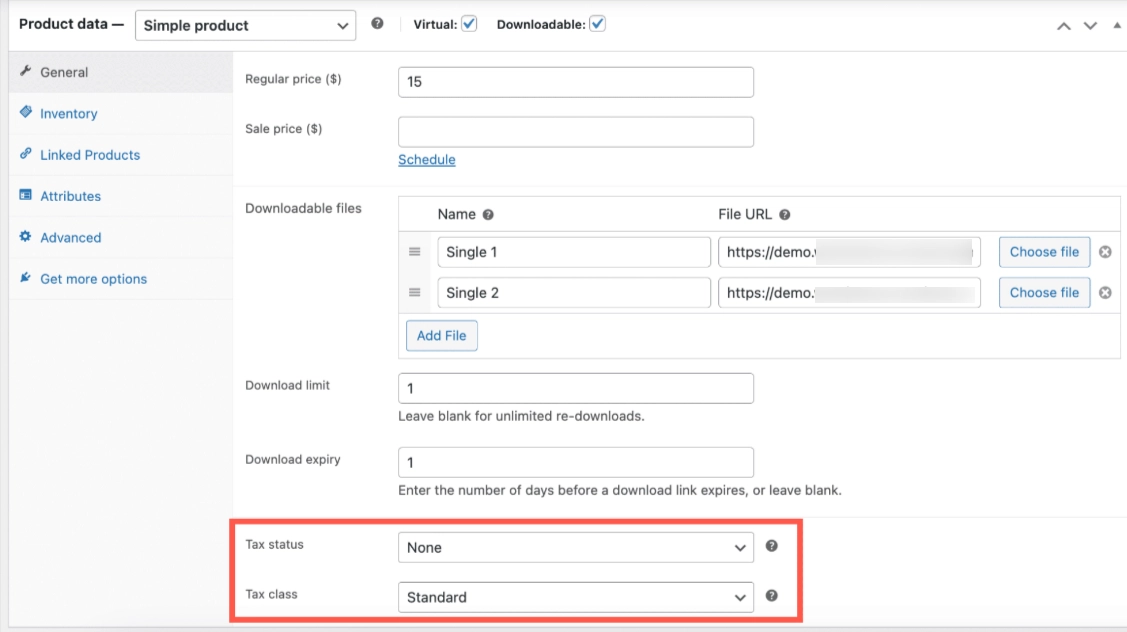
The Tax status drop-down menu offers three choices: None, Taxable, and Shipping only. Selecting Shipping Only means only the shipping cost will be taxed.
If you choose Taxable or Shipping only, you must also select a tax class.
For instance, if you’re selling a book in the UK that is zero-rated for VAT, choose the Zero Rate class. For items like clothing that are subject to the standard VAT rate of 20%, select the Standard class.
Some Mistakes to Avoid When Setting Up Sales Tax
When setting up sales tax on your WooCommerce site, it’s crucial to avoid common mistakes for smooth operations.
One critical mistake is not thoroughly researching your local sales tax requirements. Knowing which regulations apply to your organization is essential, as they might differ significantly depending on the region.
Selecting the appropriate WooCommerce sales tax plugin is another crucial factor. Ensure the plugin is reliable, regularly updated, and compatible with your store’s specific needs and WooCommerce hosting plans.
Additionally, overlooking the importance of double-checking your settings before going live can lead to errors. Take the time to review all configurations and calculations to prevent inaccuracies that could potentially disrupt operations.
Lastly, it is essential to stay informed about changes in sales tax laws. Failure to stay updated can result in noncompliance and penalties. Stay vigilant about any regulatory updates that may impact your online business’s tax obligations.
Conclusion
Setting up sales tax on your WooCommerce site is crucial for compliance and financial health. To manage sales tax effectively, understand the basics, research requirements, choose the right plugin, and follow a step-by-step guide. Avoiding common mistakes ensures smooth operations. Proper setup and monitoring allow you to focus on business growth while complying with sales tax laws.
Author Bio
Rajiv R.
Rajiv Ray is an experienced professional in web hosting with 20 years of expertise. He’s well-known for his deep understanding of the industry and has made valuable contributions to the success of many projects throughout his career. He is highly experienced in server management, security protocols, and new technologies. Recognized for his dedication and innovative solutions, he continues to play a crucial role in the ever-changing world of web hosting.